Category: Windows (Page 2 of 5)

Windows Master Control Panel

Remember the Control Panel? It was the best thing that Microsoft made to adjust and tweak the way their Windows OS worked. But then, starting with Windows 8, we were forced to deal more with their Settings Panels, as they hid away all those classic controls.

But it’s still there. To this day, you can find the Control Panel and use it on any modern Windows computer. Right-click your Start button and select Run. Type the word “control” and click OK. Look familiar? You can also press Win + R on your keyboard and then type “control” to go there, too.

But Control Panel fanatics swear by the “God Mode” panel. I’m not sure we should call it that, seeing as people can be sensitive to throwing around the G-word. The real name of this thing is the Windows Master Control Panel, and it’s a single icon that gets you to a collection of all the essential Control Panel shortcuts you’ll ever need. If this sounds like your jam, here’s how to create this on your computer:

  • Highlight, right-click and copy the below string of characters:

GodMode.{ED7BA470-8E54-465E-825C-99712043E01C}

  • Go to your desktop wallpaper and right-click a blank area. Hover over “New” and then click “Folder.”
  • Press CTRL + V to paste in that string of text as the folder’s name. and then press Enter.
God Mode? Goddess Mode. Flying Spaghetti Monster Mode!

You’re done! You’ll have a new nameless icon on your desktop, and when you double-click it, you’ll feel like a computer deity with all these useful Control Panel functions at your disposal.

Microsoft Power Toys

Microsoft Power Toys

Microsoft offers a batch of extra tools and utilities for anyone to add to their Windows computers. These “Power Toys” come bundled together as a single free download, and you can get them here or from the Microsoft Store.

Some of these tools are basic while others are for advanced users, so breeze through the list to see if any of them appeal to you. I especially like remapping keys on my keyboard with the Keyboard Manager toy…

BitLocker Has Locked My Computer!

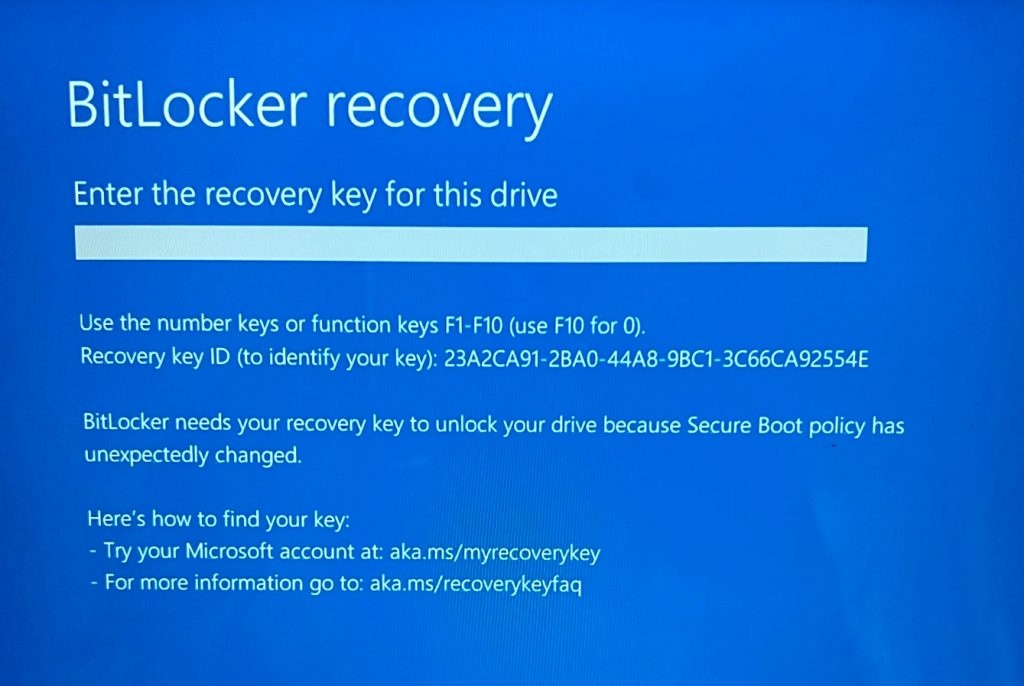
A small number of people are encountering this message on their Windows 11 computers right now, following some overnight Windows Updates:

And for those who discover this, it’s about as fun as having a dead battery in your car or no dial tone when you pick up the phone. The computer is stuck like Chuck and won’t go anywhere!

What To Do

This is solvable but the solution is not necessarily intuitive to all. I’ll describe the process, but please reach out to me if you want help along the way.

First, you must know the Microsoft Account credentials you’ve used on your PC. This is usually your email address, and the Microsoft account password that goes with it. Your PIN will not help and your Microsoft password is different from your PIN! If you’ve forgotten your Microsoft password, you’ll need to reset it.

You’ll need to go to a different computer or device, and visit this site to log in with your Microsoft credentials: Microsoft Account.

Once you’ve logged in successfully, click “Devices” along the top toolbar selections. Then down lower, click on BitLocker recovery keys and you’ll arrive at a screen like this:

Using the Device Names, try to find the corresponding row for your locked device. Then take the longest string of numbers to the right, and type it in to the BlueScreen message. If done precisely, your computer should unlock and boot into Windows as normal.

Follow-Up Info

BitLocker is a drive encryption tool, and Microsoft only includes it on the Professional, Education and Enterprise editions of Windows. If you have Windows 11 Home edition, this issue won’t happen to you, and you won’t find Bitlocker if you go scrounging around in the Settings panel for it.

But if your computer does offer BitLocker, please know that you do have the option of turning it off. BitLocker is a powerful tool for protecting the data on a computer, in case of theft, but not all may want to use that tool, especially if it caused this problem or some other stoppage. Here’s how to track it down on your computer:

Go to Start -> Settings -> Privacy & Security -> Device Encryption.

At this panel, you are free to enable or disable this feature. If you cannot see the Device Encryption option, then it is simply not offered on your Windows computer.

The End of the Line for Windows 8

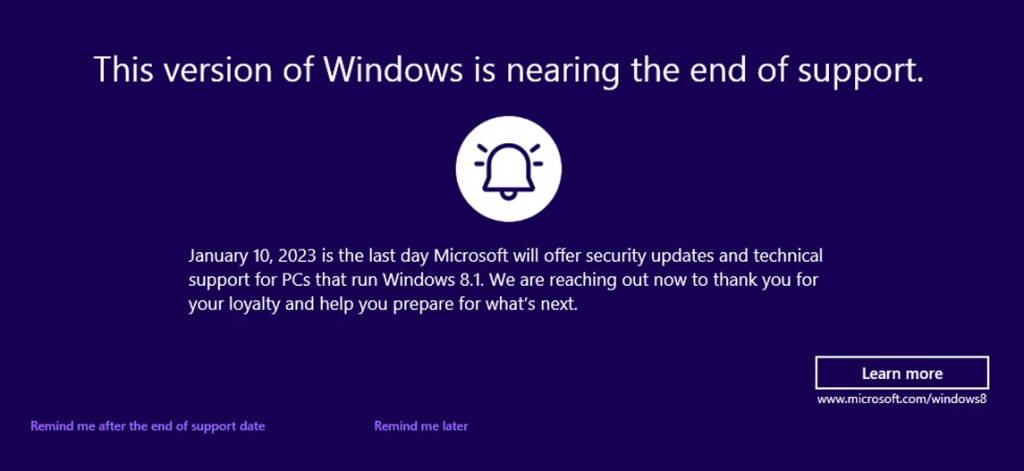
For those of you still using Windows 8 computers, you’ll soon meet with legitimate popup messages, as shown below:

This is not a scam, and Microsoft is telling you the truth. Windows 8 reaches the end of its lifecycle on 1/10/2023. But Don’t Panic! Here are more details to help you navigate what’s next.

You May Keep Using Windows 8

You don’t have to do anything. Your Win8 PC will keep working fine, even past 1/10/2023. But after that date, there is an unknown amount of security risk. I’m not too worried about it, but I also cannot tell you there is no risk. If you stick with Windows 8 after 1/10/2023, you must check your antivirus to make sure it is still running and updating!

Still, after that deadline, other issues may develop. Other programs, like Google Chrome, may also stop updating. And over time, with many things getting so deprecated, that could lead to unexpected security problems. You might see security errors as you load your email. You might one day be blocked from logging into your bank accounts. Zoom or Quicken or other apps may fail to load.

So while you can probably Windows 8 past its deadline, you’ll want to take action at some point before a software malfunction crops up to frustrate you. You’ve got two ways to proceed:

Option #1: Buy a New Computer

Microsoft would love for you to buy a new computer. If it’s in your budget to do so, you’ll be moving to a system with Windows 11 on it, and its lifecycle has no declared end date as of this writing. Reach out to me if you need a recommendation on what to buy from Costco or some other store you prefer.

Option #2: Upgrade Your PC to Windows 10

PCs running Windows 7 or 8 can still receive a free upgrade to Windows 10. Yes, I promise you it is a free download, it never stopped being free, despite rumors and erroneous news reports. If you want to try this:

  • Go to this Microsoft download site.
  • Under “Create Windows 10 Installation Media”, click the Download Now button.
  • Save and then Open/Run the MediaCreationTool.exe file.
  • Agree to the Licensing Agreements and choose the option to Keep Your Apps and Files, when prompted.

Please know that this undertaking could take hours to complete, especially if you are still on a slow DSL connection. The download involved are several gigabytes in size! But with enough patience, your computer will adopt Windows 10, which has a lifecycle lasting until October 14, 2025.

no@thankyou.com

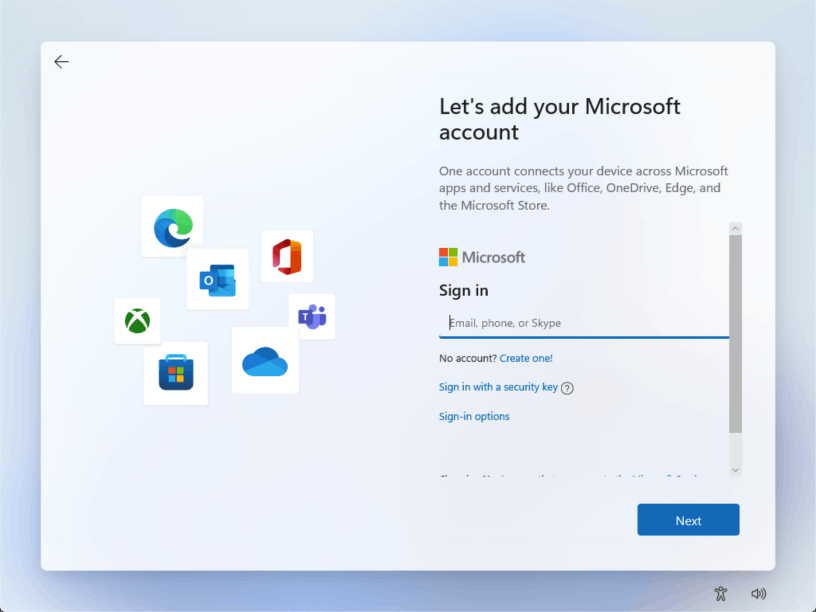
When first turning on a new PC, you’ll field a few basic questions before meeting the demand that you use a Microsoft account. And while there are some benefits to doing so, not everyone wants to do that. Some people just want to keep their email and other info to themselves. If this is your preference, then you need to know about “no@thankyou.com”.

no@thankyou.com

Windows 11 is very forceful about getting everyone to use a Microsoft account. If you are sitting at a Sign In screen on your new PC, you probably will see no way around it. Here’s how to bypass it:

In the field asking for an email, phone or Skype, type in no@thankyou.com

Click Next and the next screen will ask for password entry. Type anything you want (it doesn’t matter) in the field and click the Sign In button.

You will get an error because the sign-in attempt failed. And on the next screen, you’ll be asked “Who’s going to use this device?” Simply type in any name you wish, and you won’t be asked again for a Microsoft account!

After entering your name, you will be asked to supply a password. This can be anything you want, short or long. Or you can even leave it blank (if you don’t want a password on your computer).

Antivirus for Very Old Computers

Many people continue to use vintage computers, running operating systems that are past their end-of-support date. While I recommend that these users upgrade to something modern and more secure, I understand when they stick with their classic machines. I don’t judge.

But if those computers are going to hit the internet, they do need antivirus. And as they age, it becomes more difficult to find an antivirus software that is willing to run on a much older OS. Below are some links to free antiviruses that are compatible with bygone OSes, like Vista and El Capitan.

Windows Computers

My favorite free antivirus for older PCs is Microsoft Security Essentials. But Microsoft pulled this from their sites, so use these links to get the 32-bit version or the 64-bit version . It will run on any XP, Vista or Win7 computer.

AVG still offers a free antivirus that works on XP and Vista and Windows 7.

You can also consider Avast Free Antivirus, which is equally compatible.

Apple Computers

There’s some debate on whether Macs need additional antivirus protection. For now, I’ll say: You are at greater risk if you’re using an out-of-date computer, so antivirus becomes more relevant if you’re not running the latest MacOS. If your MacOS is so old to be completely out of service, please get some antivirus ASAP.

AVG offers free antivirus for Macs here, and can install on MacOS 10.13 High Sierra or newer.

Avast offers free antivirus for Macs here, and can install on MacOS 10.11 El Capitan or newer.

Windows 11 in S Mode

note to readers: this is a reboot/rewrite of the Windows 10 S Mode post from last year

Windows 11 comes in various editions: Home, Pro, Education, Enterprise and S mode. And that last one gives many people pause. Just what is S mode? What does the S stand for? Simple, Secure, Strict, Stunted? Microsoft is mum on that question.

S Mode Defined

S mode is a locked down version of Windows. S mode means that you may not install any software on the computer, unless it comes from the Microsoft Store. This means that you are protected from many types of malware and other nasties, but also cannot load Google Chrome, Adobe Reader, Quickbooks Desktop or any other software from a download or disc.

This may be acceptable, if you can live with only ever using Microsoft Edge and Microsoft Office. This may be an instant No for other computer users.

But Should You Avoid S Mode Computers?

In short, No! Many computers at Costco, Best Buy, Microcenter and other retailers boast Windows S mode, but don’t be deterred! S mode can be removed right after you boot the computer. Microsoft allows you to remove S mode and convert your license to Windows 11 Home, for free.

But it is a one-way trip. Once you switch from S mode to Home, there’s no going back. So be sure you want to make the change, and then:

Switch Out of S Mode

Once your new S mode computer is booted and connected to the internet, go to:

Start -> Settings -> Activation.

Here you should find a wodge of text about Switching to Windows 11 Home. Under it, click the link that says “Go to the Store”. The Microsoft Store will appear and you’ll want to use the “Get” button to remove S mode.

Microsoft may demand that you sign in to your Microsoft account a couple of times, but if you jump through their hoops, Windows will tell you that you have removed S mode for good! You are then free to install any programs you desire.

One Last Thing…

Sometimes, people complain: “Hey, I removed S mode and Microsoft still won’t let me install XYZ Program!” If this happens to you, go to:

Start -> Settings -> Apps -> Apps & Features.

Under the heading “Choose Where to Get Apps”, change the drop-down menu to one of the “Anywhere” options. Close this window and then go try your installation again!

Microsoft Defender’s Offline Scan

Microsoft Defender Antivirus is part of every Windows 10 and Windows 11 computer. Whether you use Microsoft Defender or another antivirus, please know that you can use the Microsoft software to run a deep scan on your computer. This will not conflict with your current security software, and can be useful if you feel you may have a virus problem that is not being detected with normal system scans.

The “deep scan” is officially called the Microsoft Defender Offline scan, and here’s how you can use it:

  1. Click the Start Button and go to Settings. In the search field, type “windows security” and then click on Windows Security to open it.
  2. Click on Virus & Threat Protection.
    a. If you are using a non-Microsoft antivirus, click on Microsoft Defender Options and then turn on Periodic Scanning.
  3. Under the Quick Scan button, click “Scan Options”.
  4. Click the bubble next to Microsoft Defender Offline scan, and then click Scan Now.

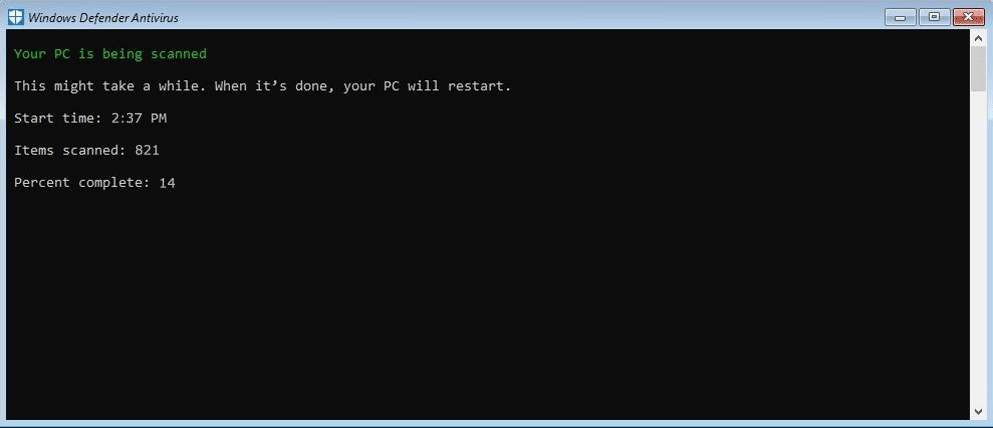
This begins the Offline scan, and will reboot your computer to fulfill this action. So close and save your work before going through with this! Expect to see this sort of scan screen running for 15 minutes or more:

After the scan is over, you may not see much, other than your computer boots up to your normal wallpaper and icons. To see the results of the scan, follow the steps 1 & 2 from above, and the Virus & Threat Protection panel will tell you if it caught any baddies. Feel free to click on Protection History for more details on your scan history.

Windows Security Center Won’t Open

Many PC users are content to use the free antivirus that’s built-in to Microsoft Windows: Microsoft Defender Antivirus. Some still call it Windows Defender, but in any case, you can get to it by clicking on the white or blue shield that lives near your system clock.

But some users are finding that they cannot enter that shield icon, after certain Windows Updates. Some Microsoft upgrades break that icon, and won’t let you see your protection software anymore. If this happens to you, there’s a quick fix for that:

  • Click the Start button and use the Windows Search function to look for “Powershell”. When you find it, right-click it and select Run as Administrator.
  • Copy and paste the following chunk of text into the Powershell window and then press Enter on your keyboard:

Set-ExecutionPolicy Unrestricted
Get-AppXPackage -AllUsers | Foreach {Add-AppxPackage -DisableDevelopmentMode -Register “$($_.InstallLocation)\AppXManifest.xml”}

  • When the operation appears to be done, close Powershell and reboot your computer. Check the Windows Security Center icon, and it should now open easily for you.

If this kind of repair is above your paygrade, feel free to call me and I can fix this for you!

Bogus Windows 11 Upgrades

There are right ways and wrong ways to get your free Windows 11 upgrade. Of course, the cybercriminals are waiting to guide you into the wrong ways.

Lately, fake upgrade websites are showing up in web searches when people go looking for a way to install Windows 11. And these frauds look very similar to legitimate Microsoft websites. If it doesn’t explicitly show “microsoft.com” at the beginning of the URL, it’s a trap!

The safest way to get the free Windows 11 upgrade is to wait for your computer to offer it to you. Eligible Windows 10 computers will eventually show a pop-up about it. If you click the message, you’ll see the following, which is trustworthy to use:

legitimate Windows upgrade notice

If you think your computer is taking too long to offer this to you, you can check manually from within Windows 10. Click the Start button, go to Settings, then to Update & Security. You may see a similar option there to Download and Install Windows 11. Or you may see some options to check your system for Windows 11 compatibility. Again, all of these options are safe to try and use.

It’s when people go searching for a download website that things get dicey. Even the best search engines can be gamed by the scammers, to show bogus offers and malware-laden downloads. If you need it, here is the real Microsoft website for downloading the various editions of Windows. That site is legitimate and contains no viruses.

If your computer is very old and ineligible to receive Windows 11, don’t go looking for a workaround. It’s just not worth it. Better to wait until you someday buy a new computer — all new computers now come with Windows 11.

« Older posts Newer posts »

© 2024 BlueScreen Computer

Theme by Anders NorenUp ↑