Category: Security (Page 1 of 4)

Do You Need a VPN?

A VPN (Virtual Private Network) is a tool for creating a secure connection between your computer and the websites you visit with it. It sounds like a sensible piece of protection for your computer. But do you need a VPN?

do you need a vpn?

Most security companies would respond with an empathic Yes!, but keep in mind that they’re selling product. I should mention that I don’t use a VPN. I don’t foresee ever needing one, and I don’t recommend them for most people. Sure, there are legitimate reasons to use a VPN. But let me give you a lot of food for thought on this topic, and you may figure out that your VPN isn’t as necessary or helpful as the industry claims it is.

I Need Protection When I Travel

A common desire for using a VPN comes when people travel and go to use public Wi-Fi. There is a fear that jumping on a public internet connection will expose their data to nearby criminals, and that a VPN will shield them from harm.

This used to be true, many years ago. When surfing to insecure websites, all data passing from your computer to them would’ve been visible to others on the same network. But times have changed, (largely instigated by Edward Snowden).

In 2024, almost all websites are now Secure by default. When you click the icon to the left of the URL in your browser, it will tell you so. And that security means that your connection to that site is encrypted, and any nearby eavesdroppers will not be able to see what you are transmitting. All of this is to say: a VPN would not offer you any extra protection to you, as you surf the web from a Starbucks. Your browser already has you covered, and will warn you if you ever happen to visit an insecure website.

I Don’t Want Big Tech Snooping on Me!

I’m sorry. I don’t want them to snoop on me, either. Whether it’s Microsoft, Amazon, Facebook, Google, Salesforce, NVidia, Oracle… they’re all hoovering up our personal data and using it to make money. And ISPs also do this. I don’t condone this practice, and I think it stinks.

But a VPN doesn’t help much to stop this. Data collection on the internet has become very sophisticated and efficient and accurate. Who cares about cookies, when tracking can be done far better using Digital Fingerprinting?

Fingerprinting is essentially a fancy name for the way companies track you, using triangulation and unique information from your computers. As you visit a website, your advertising ID and other hardware tags may be collected from your PC. And one tech company, as they build a dossier on you, may share it and combine it with info from other companies. There are ways to interfere with digital fingerprinting, but a VPN is not effective at this.

It Will Protect My Computer from Hackers

This is simply not true. A VPN connection may change your internet connection, but it doesn’t make the computer impenetrable, from a remote-control standpoint. When clients have me service their computers remotely, my software allows me to “step into” their computers, wherever they are in the world. I can service a computer that is truly in Germany. I can also service a computer that appears to be in Ghana, due to a VPN program.

And if I can remotely-connect to a computer, that means all of the scammers can do the same. The good guys and the bad guys all use the same tools! They won’t care (or even notice) if you are running a VPN.

VPNs also have no effect on phishing attempts. A computer user can still be tricked by a deceptive email, which can take them to a website that steals their password. You’ll have to look elsewhere to safeguard against that kind of threat.

Other Detriments to Running a VPN

  • It has a recurring cost.
  • It may slow down your internet connection.
  • The VPN company may collect data on your activity, and profit from that data.
  • The VPN company may hand over your information and history, if they receive a subpoena, warrant or government request.
  • The VPN company may overstate how much they protect you, and may not support you if you suffer a security incident.

When Should You Use a VPN?

There are appropriate times to use a VPN. The biggest and best reason is: Your employer is telling you to. Of course, you want to listen to your boss! If they mandate the use of a VPN, they are going to tell you exactly which one to use, and how to use it. That VPN may be necessary for you to do your job and access parts of their network that aren’t available to the rest of the world.

Another semi-legitimate reason for VPN usage is to access something that isn’t normally available in your country. For example, if you want to watch an Italian news channel from your location in the USA, it might not be allowed for your American IP address. But a VPN can make it look like your computer is in Venice, and that might allow you to view that restricted content. However, be careful if you attempt this. If you are caught bypassing such barriers, you could be banned from using that service or worse!

Finally, I do see streamers and other internet personalities using VPN software. This is for their protection, because they might be specifically targeted by cybercriminals and people with high-level hacking skills. But this is for celebrities and famous people with a significant internet footprint. If you’re a regular person like me, you won’t have to worry in this direction.

Low-Hanging Fruit

In the technology world, people are jeopardized by two separate yet equally scary groups: the big tech companies, who care only for monetizing their users’ data; and the opportunistic scammers, who prowl the web looking for victims. These are their stories.

Dear Xxxxxx,

I’m writing this letter to you about your kiddo. Please don’t worry, this is not one of those Are-you-sitting-down? notes. But let me explain something that you might think is a teachable moment:

Facebook recommended your daughter’s profile to me, as a potential friend-connection. I haven’t Friended her, but I did click on her name to look at her profile. And Egad, She’s got too much personal info out there. I am able to view all of this info on her profile, because it’s all set to Public visibility:

  • Complete FB Friends List
  • Name of high school and college, with admission years and major
  • Hometown and current city/state of residence
  • Mother, father, brother and uncle’s names, with links to their FB profiles
  • Birthdate
low-hanging fruit

If I can view this info, then anyone in the world can. I’m thinking about the scammers that are having a field day on Facebook — all of this sensitive info is essentially low-hanging fruit to them. “Easy pickin’s”, if you’re into that country vernacular. And I’m not so concerned about your daughter here, as I am the people connected to her. She’s probably smart enough to dodge the average Facebook criminal, but what about all of her friends and family?


A publicly-visible Friends List is what attracts scammers that clone profiles. In essence, a bad guy could create a brand new FB account, and give it your daughter’s name. S/he could copy and use your daughter’s profile pic. And then they’ll start sending Friend Requests to everyone they see on her F-list. If any of her FB Friends are too trusting or naive or quick-with-the-mouse, then they may connect with an impostor-scammer, who is ready to pretend to be your daughter and con some money from them.

Publicly-visible family connections are interesting to a different type of crook. Sometimes, cybercriminals attempt the “grandparent scam“, where they call a family member and pretend to be someone else in the family. The scam usually starts with a phonecall: “Uncle Ned, it’s me, Saoirse, I’m in NYC and I’m in jail! Can you wire-transfer me some bail money?” In order to carry out these schemes, they study family names & connections and it really can help their ruse hold up. Full disclosure: I unknowingly contributed to a grandparent scam, several years ago. A scammer saw some family names on my FB masthead photo, glommed some specifics about my family, and tried to scam someone important to me. Live and learn, never again!

And showing your hometown and school info to the public is just all-around ill-advised. That info is commonly connected to account security questions, so an identity thief might appreciate this kind of info.


My hot-take on Facebook is this: Mr. Zuckerberg & Co. spares all expense in running their platform, and they are not looking out for their users. When on Facebook, we are not customers, we are simply “the Product.” The scammers are very aware of what Facebook tolerates and ignores, and they exploit that knowledge to their greatest benefit. This has been happening for a long time now, and I have no reason to anticipate any improvement. If we’re going to use Facebook, then it’s up to each user to mind their own safety.

So, if you think your daughter would be receptive to some advice, let her know she should go to her Facebook Profile, and change all of her personal info to be less Public. To the right of the Friends List is a 3-dots button that allows you to Edit Privacy. She can also go through all of the sections under “About” on the profile, and use the Pencil or 3-Dots buttons to up the privacy levels. Personally, I’ve set most of my Profile to the “Only Me” level, but the “Friends” level is good, too. Anything besides “Public!”

And if she makes these improvements, there a tool for her to check herself. If she goes to her Profile, there’s a 3-dots button to the right, just below the masthead photo. She can click that and then go to “View As”. This presents her profile as it appears to the public (to people who are not connected to her on FB). She can traipse through her own profile in this mode and judge if she missed anything that needs hiding away.

Cheers! — Jesse

YouTube vs. Ad Blockers

Google is taking a more visible stand against those who would block their ads on YouTube. Many people are meeting with special notices as they visit YouTube, if Google detects any kind of ad-blocking going on. The battle of YouTube vs. Ad Blockers may evolve further, but I’ll explain what I can, for right now.

Ad-Blocking Technology

I’ve been strongly recommending ad-blocking for a long time now. Most of the malware, adware and scams that I help people with are attributable to some ad or pop-up that they encountered. And most of those malicious ads come from normal, trusted websites, or appear at the top of ordinary, everyday search queries. I generally prescribe a free ad blocker in each person’s primary web browser, and I consider it their second-level of protection (their antivirus being the first).

Most ad blockers install right into the browser, as an extension. Many ad blockers are offered for free, although some offer a paid/premium option, if you want to support them monetarily. Also, some browsers come with ad-blocking already built-in (Brave browser, Opera browser). Also be aware that some protection-extensions, like MalwareBytes Browser Guard, strive to suppress ads as they guard over you.

I’m mentioning three avenues of ad-blocking explicitly, because any one of them can trigger warnings from YouTube:

YouTube’s New Warning Notices

If your browser is suppressing advertisements, you are likely to see this kind of warning as you use YouTube:

YouTube vs. Ad Blockers

You can close it and continue. If you do, expect to eventually see another warning:

If you keep ignoring Google’s messages, then you will probably find that YouTube.com stops working for you.

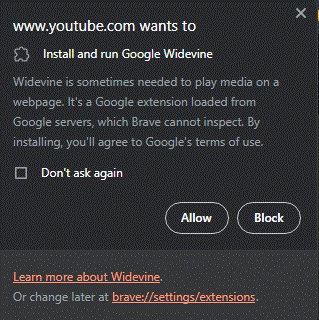
I should also mention that defying Google’s edict on ad blockers could also result in this pop-up:

Widevine is a type of DRM software, and will help Google “fingerprint” your machine, so they can control more of what you do on YouTube. I do not recommend that anyone install this, if asked.

Do’s and Don’t’s

I hear a lot of grumblings from people over these notices, and sympathize with everyone. Ad blockers are a way of internet life, and they keep people safe. Forcing people to watch ads when they don’t want to is going to cause some people to take action, to “go off the reservation”. We need to discuss your options. Before you react, let’s go over your good and bad options:

Bad Idea: Ignore the messages and carry on with blocking ads. You’ll eventually hit a wall with Google, and be unable to play a YouTube video.

Good Idea: Allow ads on YouTube. Click on your ad blocker while on the YouTube website, and unblock YouTube.com. Your ad blocker will continue to block ads everywhere else you go, just not on YouTube. Please know that while many ads lead to danger, the advertisements on YouTube are well-vetted and not going to infect your system.

Protip: Return to your ad blocker a couple of weeks later and turn it back on for YouTube, as a test. Sometimes, silent updates will improve your ad blocker, so that it no longer triggers the YouTube warnings.

Bad Idea: Install some kind of script or advanced browser code to block ads, using TamperMonkey or scripting extensions. I suspect that YouTube will catch you on this, if not now, then soon. I worry that if Google catches you playing this game, they could ban you from YouTube or take more serious action against you and your Google account.

Good Idea: Consider paying for YouTube Premium. If you are a paying member, ads go away. You can also stream music and enjoy other perks with YouTube, under their premium plan. Check out the prices and details here.

Other Ideas (YMMV):

  • Try using a different browser, just for YouTube viewing. I’ve tested various browsers, and found that ad-blocking may still work well in Firefox (with AdBlockPlus or uBlock Origin) and also in the Opera browser.
  • Watch YouTube videos in Incognito/InPrivate browser windows. Note that you may need to adjust your ad blocker to run in these private browser modes.
  • Experiment with using a VPN. I don’t fully endorse this strategy, but it is possible that it could help. If YouTube sees you viewing videos from another country, it might respond to your ad-blocking differently. But I don’t fully endorse this tactic. It’s probably safe enough. But I say: if you’re willing to spend money to not see ads, I’d sooner spend that money on YouTube Premium than I would for a VPN.

Google Safe Browsing

Google does a whole lot to protect us as we surf the web. They study web activity the world over, analyze traffic and trends, and then use that info to protect us from harmful sites. They call this service “Safe Browsing”, and it comes built into the Chrome browser and other Google products. If you’ve ever seen a scary red screen from Google, that was Safe Browsing, stepping in to save you from harm:

google safe browsing

Levels of Protection

But Google offers different levels of Safe Browsing protection. You should know a little more about them and choose one that feels best for you.

  • Enhanced Safe Browsing
  • Standard Safe Browsing
  • No Protection

Enhanced Safe Browsing is the highest level of protection you can choose in your browser/Google account. But it involves allowing Google to see more of your browsing activity, in real-time, as you surf the web. I use this option myself, but if you have privacy concerns, you may prefer to remain at the Standard level.

Standard Safe Browsing is still a good level of protection. Google will help warn you about phishing websites and malicious downloads, as you use the internet.

No Protection is not to be used. Please don’t opt for this. I suspect it is only there for development and testing purposes. Unless you a tech professional and know what you are doing, ignore this option.

Where to Check Safe Browsing Settings

On a computer, open Google Chrome and go to the 3-dots button in the upper-right corner. Click Settings, then click Privacy and Security (on the left), then click Security (in the middle). You’ll see this sort of screen, where you may adjust your protection:

On a mobile device, the steps are very similar: Open Google Chrome and go to the 3-dots button in the upper-right corner. Tap Settings, then click Privacy and Security, then scroll down to Security and tap Safe Browsing.

You can also turn on Enhanced Browsing for your entire Google account, if you have one. This extends your protection into other apps and services you may use with Google, and may also alert you if Google notices your info in data breaches. This link should take you directly to the relevant panel in your Google account.

Final Tidbits

If you check or change this setting, please review it on all of your devices and computers. In my experience, setting it on one device does not automatically carry over to others.

Most browsers offer extra protection in this way, and many use Google’s Safe Browsing service, albeit under a different label. You can open a different browser and go into its Settings -> Security panel to see what’s offered.

I generally recommend setting this browser protection to its maximum level. I see a lot of infected computers in my daily work, and I do suspect that some of the malware I remove might’ve been stopped by stricter browser security.

If you ever want to check a specific site against Google’s Safe Browsing list, go to this page and paste in any URL you want. It’ll tell you if they think the site is safe or a phishing hazard. And if you have found a dangerous site that you wish to report to Google, submit the URL at this page.

Hiding Photos on Your Phone

hiding photos on your phone

Smartphones offer you an important tool for hiding photos on your phone. Whether you have an Android or an iPhone, you should consider using this function!

For Android users: Google gives you the ability to securely stash photos in the Locked Folder, in the Google Photos app. Here’s a simple Google article on how you would use it.

For iOS users: Apple offers the same sort of tool, but they call it the Hidden Folder. Apple offers this article to explain on its use.

Once you’ve placed anything in this special folder, you should know:

  • These items are well-protected, and you’ll have to enter your passcode or thumbprint every time you enter the folder.
  • When you move a file into the Locked/Hidden Folder, that file is removed from its location in your photo library. That also means it disappears from the normal cloud backup and any other devices that it synced to.
  • The contents of this protected folder won’t turn up in any searches performed on your phone.
  • If you still want an important photo to be backed up or synced, make a copy of it and move the copy into this folder.

Possible Uses

With a little imagination, you’ll find a variety of uses for this tool. Perhaps you have some delicate photos that shouldn’t be seen by anyone who borrows your phone. Maybe you need a safe place for some critical evidence you’ve photographed. My favorite, though, is keeping a record of everything that’s in my wallet.

It’s true, I could lose my wallet and my phone at the same time. So I’ve also recorded my wallet contents elsewhere at home. But let’s say I’m travelling and my wallet decides to travel somewhere without me. I’ve socked away a photo of each card in my wallet. I can immediately go to my Locked Folder, refresh my memory of all the cards I carry, and start calling the associated banks and companies. It would make a tough situation a little easier to resolve.

Microsoft’s Over-Protective SmartScreen

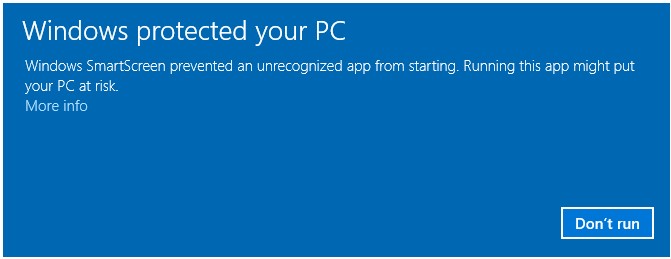
Windows computers have a lot of built-in protections, to help fend off viruses and malware and more. One of these protective components is called SmartScreen. Microsoft SmartScreen is always watching for malware and phishing attempts, and may pop up at any time, to ask if you really want to run that file. Or it may simply prevent you from opening something. Sometimes, SmartScreen is over-protective like that.

Microsoft's Over-Protective SmartScreen

In general, I recommend that people abide by this sort of message. SmartScreen is there for the health of your computer, and if it is blocking something you’ve just downloaded, there may be a good reason for that. Better safe than sorry. But once in a while, SmartScreen will clamp down on a file that you know darn well is perfectly safe. In that case, you can ask SmartScreen to ease up, for just that one file.

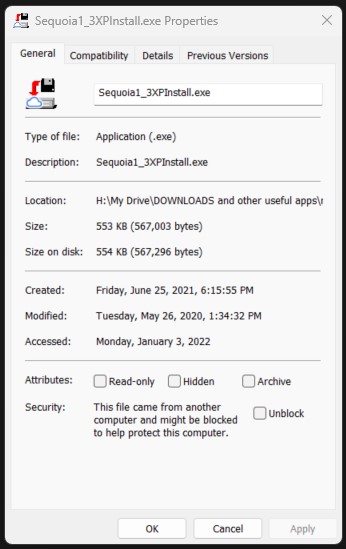
To disable SmartScreen for a particular file, first open a File Explorer window. Using File Explorer, locate that file. Right-click your file and then left-click Properties. At the bottom of the Properties window, check the box next to Unblock, and then click OK.

File Properties screen

Please be careful with this tip. Only use this tactic on files you are 100% sure to be safe.

Stolen Facebook Accounts

stolen facebook accounts

There is a large rise in Facebook Account Theft right now. I can’t explain the sudden surge, but for the last few weeks, I see people complaining about and suffering from stolen Facebook accounts almost every day. We need to go over the details, so that you are prepared and protected.

How Facebook Accounts Are Stolen

Your Facebook account can be stolen when a bad guy tricks you into revealing your password. Or, a cybercriminal can attempt to reset the password on your account, and then trick you into giving them the reset/authorization code. Then, they set a new password on the account, locking you out and giving themselves all the control.

To finalize the theft, the crook replaces the email address and/or phone number on your account with their own email/number. This makes it nearly impossible for you to recover your account.

Phishing emails are a common way to take passwords from people. Messages or pop-ups that look deceptively similar to real Facebook notices can pressure people to type in their credentials. But right now, I’m seeing a lot of password-theft happening via stolen accounts, using impersonation tactics. Example:

John Doe gets a PM from his cousin, Uncle Buck. “Hey, John! I’m having trouble with my Facebook account, and I need your help. Imma send you a code — can you tell me what that number is? It’ll help me reset my password, thanks!” John Doe thinks he’s helping his uncle, so he waits for the code to arrive by text message. When it comes, he types it in and sends it over.

But Uncle Buck isn’t Uncle Buck. A cybercriminal is inside Buck’s account, and when he gets the code, it allows him to finish a password reset on John Doe’s account. John Doe soon finds this out, when he is forced out of Facebook and cannot log back in. His account has been hijacked just like Uncle Buck’s.

How to Protect Your Facebook Account

  • Never share any security code with anyone. When a numeric code is texted or messaged to you, it is for your use only. In the wrong hands, that simple code can defeat the security of an important account. This goes for Facebook, Gmail, your bank login and any other online account you use.
  • Facebook offers some basic security tips at this page. Implement as much of their advice as you can handle.
  • Consider setting up additional security features for your Facebook account, like 2FA and login alerts. More info on that at this page.
  • If you get any fishy emails or PMs from people you would normally trust, pick up the phone and call the sender. Figure out if they really sent those message, or if you’re corresponding with some impostor in Scamdinavia.
  • Change your Facebook password at the first sign of trouble.
  • Review your Facebook Profile and make sure your Friends List, phone number and other personal info is not viewable by the public. The privacy level on that info should be “Friends Only”, or better yet, “Only Me.”

What to Do If Your Facebook Account is Stolen

  • Do not delete any security-alert emails that you receive from Facebook. They could be invaluable toward recovering your Facebook. When your password, email address or other sensitive info is changed on your account, you will receive an email. Each message will state: “If you did not make this change, click here.” Sometimes, clicking where indicated is your only hope of reverting the scammer’s change!
  • Try to recover your account at www.facebook.com/hacked . Alternate links and methods are at this page. I must warn you, though, this process can be time-consuming, frustrating and ultimately unsuccessful. Facebook has made this process difficult, and there is no easy way to contact them.
  • Contact people outside of Facebook, to let them know your account has been compromised. Tell them to not trust your account until further notice. Ask them to look at your account for any suspicious posts or content. If they see anything that looks bad, suggest to them that they report it to Facebook.
  • If you want to try to call Facebook, please know that it probably will not help. They do not want to answer the phone for non-paying customers, and at this time, you cannot yet pay Facebook for proper support. But I will give you their corporate numbers in California, just in case: 650-543-4800 and 650-308-7300. Please be careful seeking out other Facebook contact info, as most of the phone numbers you might see in a Google search belong to scammers.
  • There are many companies on the internet that claim to be able to recover your stolen account, for a fee. Most of these are fraudulent operations. Beware! But one company called Hacked.com seems to be legitimate. I can’t vouch for them 100%, but they have a significant internet footprint and reasonable reviews about the recovery services that they provide.
  • If all else fails, or the recovery process is too money or time-consuming, make a new Facebook account.

Relevant for Protecting Other Social Media Accounts

This post focuses on Facebook, as that’s where I’m seeing the most harm done right now. But the overall threat and advice is relevant elsewhere. LinkedIn, Instagram, Twitch, Twitter… Accounts can be targeted and stolen on many other social media websites, using the same tactics I’ve described.

And the amount of support you get (almost none) will probably be the same, if you are a free or non-paying user. I will help where I can, but I have no special abilities to get Facebook to do the right thing. It’s up to you to stay alert and not get in a jackpot. Stay suspicious, my friends!

Canary Tokens

Miners used to bring canaries with them deep underground, to help detect dangerous gases. If the bird perished, the humans knew to retreat before they too suffered harm. Nowadays, the canary-in-a-coalmine concept extends to other type of alerts & security “tripwires”, such as Thinkst‘s Canary Tokens.

Offered as a free service, this website allows anyone to generate a canary token and make immediate use of it. Now, many of the token options are beyond my ken, and I won’t embarrass myself, trying to explain them. But there are a few options here that are accessible & usable by most computer users. If you click the first drop-down menu on their token page, consider the options for Microsoft Word Document, Microsoft Excel Document and Adobe Reader PDF Document.

Creating a Token

Select the token document type, fill in an email address and the notes field below. Here’s an example:

Click the Create button and then the Download button on the next page. For the pictured example, you’ll now have a Word doc with a weird name to it. And now you can plant it somewhere to test your security.

Examples of Use

With a Word, Excel or PDF file token, you might just place the file on your computer’s desktop, or some other conspicuous place. Rename the file to be PASSWORDS.docx or InvestmentAccounts.pdf and then wait. If someone comes snooping while you are away from your system, you’ll get an email as soon as the file is opened.

If you’re an employer, you might test your staff’s security savvy by emailing out a harmless test phishing message. Send them a suspicious email with a token attachment. If they aren’t fooled, and they report the message to you as a fake, great! If they trust the email and open the attachment, you’ll get email receipt(s) about it. Depending on the results, you might follow-up with some internet safety training.

If you are worried that your email is being intercepted, then attach the token file to a new message and send it to yourself. When you receive your own email, let it set and do not open the attachment yourself. If you later get a canary token alert, that will help to prove that the attachment was opened by someone else.

Final Comments

I’m just scratching the surface with what canary tokens can do. If you work in web design, infosec, or other tech fields, the other listed options for canary tokens may make a lot of sense to you. They can help you figure out if/when your database has been stolen or misused, when a website has been intruded upon, and more.

Also, please appreciate that this tool is not specific to any operating system. You can use canary tokens on virtually any machine you have control over.

I Found Someone’s Phone

I Found Someone's Phone

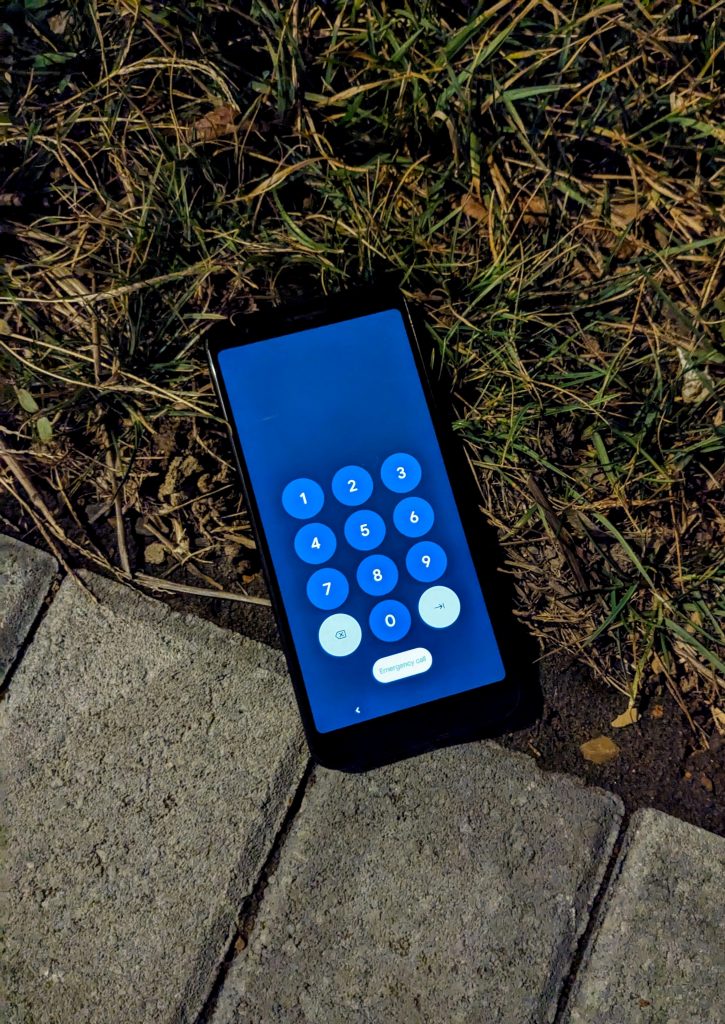
Everyday, I see this posted to social media: “I found someone’s phone, anyone know whose it is?” And it rarely works. It can’t hurt to crowdsource the request, but please know that you should first check the found phone for Emergency Info.

  • On an iPhone, trigger the Lock Screen and tap Emergency, then tap *Medical ID.
  • On an Android phone, trigger the Lock Screen and tap Emergency, then tap View emergency info.

The following screen may reveal one or more Emergency Contacts. Tap on an Emergency Contact to call them on the spot. You may be able to work with them to reunite the phone with its owner!

Add Emergency Info to Your Phone

Now that you know this tidbit, your next question is probably “How do I add Emergency Contacts to my phone?”

  • On an iPhone, find and open the Health app. Tap your picture to the upper-right and then tap Medical ID. Tap Get Started, and fill out your basic info. Scroll down to find the Emergency Contacts section.
  • On an Android phone, find and open the Safety app. Sign in if prompted and then fill out your basic info. Scroll down to find the Emergency Contacts section.
  • Add at least one person as an Emergency Contact, and now they can be dialed from your phone, even when it is lost and locked. Note: you can only add them if they are in your normal Contacts list.

As you venture into this part of your phone, you may find a wealth of other safety features. Some phones may offer Car Crash Detection, Emergency SOS and the ability to record and store a video. Explore and learn about them, and activate any others you think are a good idea. Semper Paratus!

Miscellany

If you’ve lost your phone, I’ve already blogged about how to track it down. Make sure to use those methods before you report the phone as lost and disable the SIM.

If you have found someone’s phone, but cannot determine the owner, then you’ll have to figure out what to do with it. Use your best judgment and factor in these items:

  • Apple does not typically assist with lost iPhones.
  • Keep the phone on and charged, if possible. The owner may call at any moment!
  • Turning the phone into the local police is a solid option.
  • Turning the phone over to a storefront might be helpful, depending on the circumstances. A phone found in a dressing room should go to the front sales desk. A phone found in a strip mall parking lot? Surrendering it to the police may be a better idea.
  • If you can tell what cellular provider services the phone, then you might be able to take it to the appropriate cellular storefront. T-Mobile definitely welcomes you to bring in a found phone. Others may help as well, give them a call before you make the trip.

BitLocker Has Locked My Computer!

A small number of people are encountering this message on their Windows 11 computers right now, following some overnight Windows Updates:

And for those who discover this, it’s about as fun as having a dead battery in your car or no dial tone when you pick up the phone. The computer is stuck like Chuck and won’t go anywhere!

What To Do

This is solvable but the solution is not necessarily intuitive to all. I’ll describe the process, but please reach out to me if you want help along the way.

First, you must know the Microsoft Account credentials you’ve used on your PC. This is usually your email address, and the Microsoft account password that goes with it. Your PIN will not help and your Microsoft password is different from your PIN! If you’ve forgotten your Microsoft password, you’ll need to reset it.

You’ll need to go to a different computer or device, and visit this site to log in with your Microsoft credentials: Microsoft Account.

Once you’ve logged in successfully, click “Devices” along the top toolbar selections. Then down lower, click on BitLocker recovery keys and you’ll arrive at a screen like this:

Using the Device Names, try to find the corresponding row for your locked device. Then take the longest string of numbers to the right, and type it in to the BlueScreen message. If done precisely, your computer should unlock and boot into Windows as normal.

Follow-Up Info

BitLocker is a drive encryption tool, and Microsoft only includes it on the Professional, Education and Enterprise editions of Windows. If you have Windows 11 Home edition, this issue won’t happen to you, and you won’t find Bitlocker if you go scrounging around in the Settings panel for it.

But if your computer does offer BitLocker, please know that you do have the option of turning it off. BitLocker is a powerful tool for protecting the data on a computer, in case of theft, but not all may want to use that tool, especially if it caused this problem or some other stoppage. Here’s how to track it down on your computer:

Go to Start -> Settings -> Privacy & Security -> Device Encryption.

At this panel, you are free to enable or disable this feature. If you cannot see the Device Encryption option, then it is simply not offered on your Windows computer.

« Older posts

© 2024 BlueScreen Computer

Theme by Anders NorenUp ↑