Category: Windows (Page 4 of 5)

Windows 10 Gaming Performance Fix

Since March 2021, some gamers have had some real problems on their Windows 10 computers. The problem was not with your casual games, like Solitaire and Mahjongg, but with more demanding games, like CS: GO and GTAV. Many players could not resolve issues with stuttering and low frame rates, and it all traced back to Microsoft as the culprit.

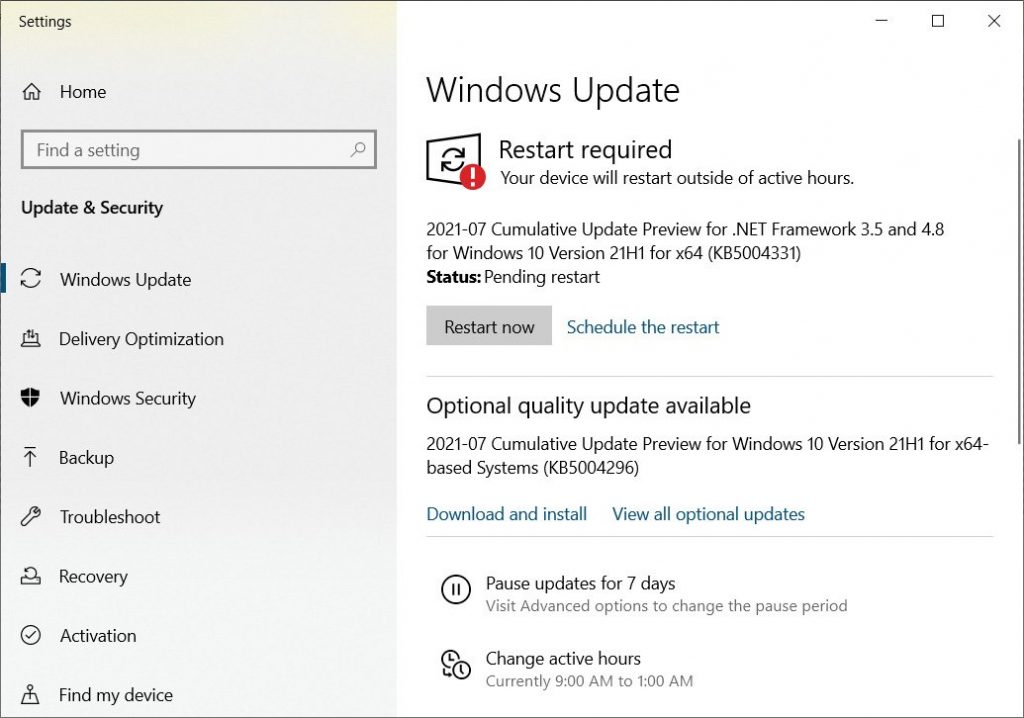
Microsoft has finally developed a fix. And while the fix is included in a larger update next month, Microsoft has gone the extra mile and released the gaming fix now, as an optional update. If you’ve been suffering under this problem, go get the download now:

Click Start, go to Settings, then Update & Security. You should see the update in question (KB5004296 ), under the heading “Optional quality update available”:

Click “Download and install”, wait out the update process, and reboot when it appears finished. I hope this improves your future games!

Windows 11 Is Coming

Microsoft is starting to talk about their next version of Windows, and we may see it released in late 2021 or early 2022. Windows 11 will be a free upgrade for any computer running a legitimate copy of Windows 10.

But not all computers will be able to handle Windows 11. If you care to check your computer’s compatibility, Microsoft made this quick software tool for all to use. Download, run and open that program, and then click the big blue Check Now button.

If your computer is found to be Not Compatible with the upcoming Windows, no need to worry. Windows 10 will be supported through October 2025. And you’ll be welcome to use Windows 10 past that time, just as there are still some folks using Windows 7 in 2021.

For more general info on Windows 11, check out the intro page over at Microsoft.com.

Windows 10 in S Mode

Windows 10 comes in a few editions: Home, Pro and S mode. And that last one gives many people pause. Just what is S mode? What does the S stand for? Simple, Secure, Strict, Stunted? Microsoft is mum on that question.

S Mode Defined

S mode is a locked down version of Windows. S mode means that you may not install any software on the computer, unless it comes from the Microsoft Store. So on a Windows S mode computer, you are protected from most types of malware and other nasties, but also cannot load Google Chrome, Adobe Reader, Quickbooks or any other software from a download or disc.

This may be acceptable, if you can live with only ever using Microsoft Edge and Microsoft Office. This may be an instant No for many computer users.

But Should You Avoid S Mode Computers?

In short, No! Many computers at Costco, Best Buy, Microcenter and other retailers boast Windows S mode, but don’t be deterred! S mode can be removed right after you boot the computer. Microsoft allows you to remove S mode and convert your license to Windows 10 Home, for free.

But it is a one-way trip. Once you switch from S mode to Home, there’s no going back. So be sure you want to make the change, and then:

Switch Out of S Mode

Once your new S mode computer is booted and connected to the internet, go to:

Start -> Settings -> Update & Security -> Activation.

Here you should find a wodge of text about Switching to Windows 10 Home. Under it, click the link that says “Go to the Store”. The Microsoft Store will appear and you’ll want to use the “Get” button to remove S mode.

Microsoft may demand that you sign in to your Microsoft account a couple of times, but if you jump through their hoops, Windows will tell you that you have removed S mode for good! You are then free to install any programs you desire.

One Last Thing…

Sometimes, people complain: “Hey, I removed S mode and Microsoft still won’t let me install XYZ Program!” If this happens to you, go to:

Start -> Settings -> Apps.

Under the heading “Choose Where to Get Apps”, change the drop-down menu to “Anywhere”. Close this window and then go try your installation again!

News & Interests Widget on Windows Taskbar

Update: Windows 11 is now adding this to your taskbar, on the far left, after recent upgrades. New info about that below!

Windows 10

As Windows 10 computers receive a particular Microsoft update, people are noticing something new on the taskbar. To the lower right, near your notification icons, now appears a weather symbol and temperature. This “News & Interests Widget” pops up all kinds of info, as you hover over it with your cursor.

If you don’t care for this new feature, you can easily turn it off:

Right-click on the temperature number on the taskbar, then hover over “News and interests”, then click Turn Off.

If you still want to try this widget, but want to quiet it down a little, you can go into the above “News and interests” menu, and turn off Open on Hover or “Reduce taskbar updates”.

Windows 11

In February 2022, this weather/news widget is showing up after a Microsoft update, but on the far left of the taskbar. That makes it a little less invasive, until you hover your cursor over it. Then it barges in and takes over a third of screen with news and other info! Turning this off is a different process on Win11:

Right-click a blank part of your Taskbar, and then click Taskbar Settings. Next to “Widgets”, move the slider to Off.

File History – The Windows 10 Data Backup Tool

If you want to backup your data on your PC, I recommend File History. It’s included in Windows 10, it’s free, and you can use it with any external hard drive or flash drive. And once you set it up, it runs automatically whenever your backup drive is connected. You can even leave the drive connected all the time for continuous data backup!

Finding File History

You can get to File History via two routes under Windows 10:

  1. Click Start -> Settings -> Update & Security -> Backup -> Backup using File History.
  2. Press Windows + R on your keyboard, type control and press Enter, change the View to Icons if necessary, and then double-click File History.
Making Shortcuts to File History

On your desktop, right-click on a blank area, go to New -> Shortcut. Where it asks for the location of the item, type/paste in:

ms-settings:backup

On the next screen, type Microsoft Backup or File History or anything else that makes sense to you. After you click Finish, you’ll have a shortcut that takes you directly to the Microsoft Backup settings, as per 1) above.

If you enter the Control Panel, per 2) above, you can right-click the File History icon and choose Create Shortcut. The shortcut is automatically placed on your desktop. The right-click menu also allows you to Pin File History to the taskbar or Start Menu.

Setting up File History

Connect your storage device to your computer. Open File History and then click Add a Drive. Select your storage drive and then just make sure that the switch for File History is set to On.

If you’re going through the Control panel to File History, just select your drive and click Turn On and then Run Now.

Once File History is turned on properly, you can count on it to run whenever you connect the drive. It will back up your Desktop, Documents, Downloads, Music, Pictures, Videos folders, as well as some other miscellaneous app folders. By default, it will run and update your backup every hour. And it is perfectly fine to leave your drive connected all the time, for continuous backups.

Recovering Data using File History

You can start recovering files via two routes under Windows 10:

  1. Click Start and search for “Restore your files with File History”.
  2. Open File History in the Control Panel, and then click Restore Personal Files on the left.

The window that appears will show you your files and you can drill down into the folders to find what you want. Also, use the controls at the bottom to pick the time and date to restore from. Because File History backs up multiple copies of your files, you can resurrect your data from a variety of different dates.

When you’ve selected what you want to recover, click the big green button at the bottom middle. File History will bring those files back from the past and place them where they were originally on your computer. If you want to restore your files to somewhere other than their original location, use the cogwheel button in the upper-right corner. Click that cogwheel and then use the Restore To option, to choose where the restored data goes.

Using File History to Bring All of your Files Back

If you bought a new computer, or if you had to wipe your old computer and start over, File History can restore an entire backup of files for you. But the process is a little clunky, so I’ll write out the exact steps:

  1. Connect your backup drive to the computer you want to put your backed up files on.
  2. Press Windows + R on your keyboard, type control and press Enter, change the View to Icons if necessary, and then double-click File History.
  3. Check the box next to “I want to use a previous backup on this File History drive.”
  4. In the box below, click to highlight the appropriate, named backup.
  5. Click the Turn On button.
  6. File History will begin backing up your files. Don’t Panic, this is OK, just wait for it to complete.
  7. Click the Restore Personal Files link on the left.
  8. Click the Previous Version button at the bottom, and you should be looking at the latest backup from the previous computer. Select any or all files/folders, and use the big green Restore button to bring them onto the computer.
Making Sure File History Doesn’t Run Out of Room

File History will back up your files until the end of time, or until you run out of room on your drive. If this is a concern, you can have File History guard against that.

  1. Click Start -> Settings -> Update & Security -> Backup
  2. Under Backup using File History, click More Options.
  3. Find the drop-down menu called Keep My Backups, and change it to “Until space is needed.”

Now File History will automagically delete your oldest backup files, when necessary, to make room for the newest backup data.

Goodbye, CCleaner

For years, CCleaner was many people’s go-to program for cleaning up a Windows computer. It quickly finds and deletes temp files and other junk from a system. But these days, there are more reasons to get rid of it than keep it around.

First, it’s main function is replicated by a built-in Windows tool called Storage Sense. You can find this under Windows 10 by going to Start -> Settings -> System -> Storage. Turn it On, if it isn’t already. This allows Microsoft to clean your temp files for you, silently in the background, on a recurring basis.

But beyond being replaced, CCleaner may trigger your antivirus warnings. Microsoft and other companies sometimes mark CCleaner as a bad guy or a “Potentially Unwanted Program.” This may be because Microsoft takes a dim view of anything offering to “clean your registry” (please do not use this part of CCleaner!), or because CCleaner has a history of unsavory data collection.

I’ve also taken issue with CCleaner in past years, because it has led users to accidentally download Avast Antivirus onto their systems. This has caused conflicts for people with pre-existing antivirus on their systems, as two antivirus will usually fight each other and cause system problems.

TL;DR: CCleaner should be removed, and you can usually easily uninstall it by going to Start -> Settings -> Apps. You find it in the list of apps, click it, and then use the Uninstall button.

Windows Live Mail Keeps Breaking

I’m sorry to say it, but it is time that we move past using Windows Live Mail. Many of you still use it and love it, as your primary email client. But despite how awesome this program has always been, it is no longer reliable. Microsoft sunsetted this program back in 2012, but users were allowed to keep using it. Now in 2020, it is becoming clear: every time Windows 10 receives a biannual update, Windows Live Mail may stop working.

When Microsoft breaks WLM, you’ll know it because it will

  1. Not allow you to view your individual messages
  2. Not allow you to send/receive messages
  3. Claim you are low on memory or disk space

This breakage can be fixed, but I’m now seeing that the fix is short-lived. Because a repair on Windows Live mail may only last you 6 months, give or take, I must now a) recommend you move away from using Windows Live Mail and b) describe the fixes. I don’t want to “make work” for myself, and doing anything else would be unconscionable.

Since the fixes are more than many people can undertake, again, I encourage you to get ready to move to different email access. Instead of using Windows Live Mail, you could move to Mozilla Thunderbird or Windows Mail. But in many cases, switching to the Webmail site for your email is the best and most direct option. Please consider that option first!

The rest of this post describes the fixes for when WLM misbehaves. Please do NOT attempt these steps if you are uncomfortable or unfamiliar with the advanced techniques therein. BlueScreen Computer cannot accept any responsibility for any damages/data loss that occur from attempting the following repair tactics.

WLM Repair Option #1

Remove your Email Account and re-add it.

For this method, you will need to know your mail server names and other account settings. Comb through your email account screens and take notes before you proceed, or call your ISP or email provider afterwards for info and help.

Also note that this is intended for IMAP account setups. If you have previously setup your email in WLM as a POP account, you may irrevocably lose emails or folders in this process.

Open WLM and dismiss any error pop-ups.

Go to File -> Options -> Email Accounts.

Select your email account and click the Remove button.

Once your email address is gone from this window, use the Add… button to set it up again.

WLM Repair Option #2

Delete the App Data for WLM

As in Option #1, you will need to re-add your email account after these steps. Take note of your account settings in advance, or be prepared to call someone for help with the settings. And if your email account was set up as a POP, this may cause the loss of your current emails and folders..

Press the Windows Key and the ‘R’ key to open a Run window.

Type %localappdata% and click OK.

Enter the Microsoft folder, then enter the Windows Live Mail folder.

Delete all files and folders inside.

Reboot, reopen WLM and go to File -> Options -> Email Accounts to re-add your email account.

WLM Repair Option #3

Use a Windows Registry Reset

This option involves editing the registry, and you almost never see me recommending this to anyone. A mistake in the Windows Registry can harm your entire computer, and no one wants that. Do not attempt this unless you are uber-confident with your computer skills.

Press the Windows Key and the ‘R’ key to open a Run window.

Type regedit and click OK.

Drill down to Computer \ HKEY_CURRENT_USER \ SOFTWARE \ Microsoft \ Windows Live Mail

Right-click on the Windows Live Mail folder and (one at a time), create the following DWORD entries:

RecreateFolderIndex
RecreateStreamIndex
RecreateUIDLIndex

As you create each new entry, open it and change its Value Data to 1.

If for any reasons these values are already present, do not recreate them, but open each and change the Value Data to 1.

Reboot and reopen WLM.
Color Blindness & Using Color Filters

If you are color blind or have any other vision sensitivities, check out the color filters in your computer. Most operating systems offer these built-in tools, to make your screen easier to see and use.

In Windows 10, go to Start -> Settings -> Ease of Access -> Color Filters.

On MacOSX, go to Apple Menu -> System Preferences -> Accessibility -> Display – Color Filters.

Besides color deficiency-specific filters, you’ll also find others for inverting colors and switching to greyscale. These can all be turned off and on without harm or needing to reboot.

On a Chromebook, you would have to install an extension from the Play Store. Dalton looks to be the best one I can find right now. And if you want to apply color filters to your Chrome browser only, I imagine you can install Dalton on any PC or Mac, as well!

Finding Your Computer’s Serial Number

When calling in for tech or warranty support for your computer, you will probably be asked for the computer’s serial number. It’s usually stamped or adhesed to the computer chassis, and may be called S/N or Service Tag on certain brands of systems.

Except it’s not always easy to find that sticker. Maybe your office is too dark or your eyes can’t focus on the tiny writing or your computer tower is inaccessible, half-buried under files and equipment. Or maybe the serial number has worn away from the underside of your laptop and can’t be read. You’ll want an better way to get that number.

Apple makes it super-easy — just click the Apple menu and then click About This Mac. But on a Windows computer, it’s not so obvious. Here’s a trick that usually works:

In Windows, open a Command Prompt window. If you don’t see Command Prompt on your Start menu, you can right-click your Start button to get to it. Or you can press Windows+R and type in cmd .

At the Command Prompt, type in:

wmic bios get serialnumber

and press Enter, and your serial number should appear!

« Older posts Newer posts »

© 2024 BlueScreen Computer

Theme by Anders NorenUp ↑